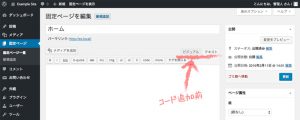
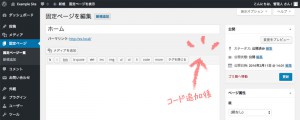
固定ページのメインエリアは記事編集画面で記事本文(コンテンツ)欄にHTMLコードを直接記述しますが、ビジュアルモードとテキストモードの切り替えでコードが書き換えられてしまう不都合を避けるために、固定ページ全体もしくは記事単位でエディタの切り替えを制限しておきます。
Contents
全ての固定ページビでジュアルエディタを制限する
全ての固定ページでビジュアルエディタの使用を制限する場合は、以下のコードをfunctions.phpに追加します。
▼functions.php
|
1 2 3 4 5 6 7 8 9 10 11 12 |
// 固定ページでビジュアルエディタの使用を停止する function disable_visual_editor_in_page(){ global $typenow; if( $typenow == 'page' ){ add_filter( 'user_can_richedit', 'disable_visual_editor_filter' ); } } function disable_visual_editor_filter(){ return false; } add_action( 'load-post.php', 'disable_visual_editor_in_page' ); add_action( 'load-post-new.php', 'disable_visual_editor_in_page' ); |
以上で下図のように全ての固定ページの編集画面でビジュアルエディタが使用不可になります。
記事ごとにビジュアルエディタを制限する
プラグインを使用する方法
固定ページごとにビジュアルエディタの使用不使用を設定したい場合は「Disable Visual Editor WYSIWYG」プラグインを利用するのが簡単です。
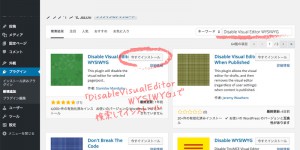 「Disable Visual Editor WYSIWYG」プラグインをインストールして有効化します。
設定は特に必要ありません。
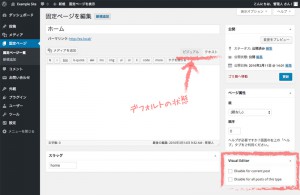 記事編集画面に「Visual Editor」の項目が追加されます。
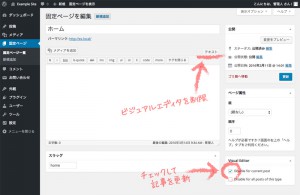 編集中の記事でビジュアルエディタの使用を制限したい場合は「Disable for current post」のチェックボックスをONにして記事を更新します。
functions.phpに記述する方法
プラグインを使用せず特定のページのみビジュアルエディタを制限したい場合は、functions.phpに次の記述を追加します。
「xxxxx」の箇所には制限したいページのスラッグを設定してください。
▼functions.php
|
1 2 3 4 5 6 7 8 9 10 11 12 13 14 15 16 17 18 19 20 |
// 特定のページでビジュアルエディタの使用を停止する function disable_visual_editor_in_page(){ global $typenow; $pageSlug = array('xxxxx','xxxxx','xxxxx'); // 制限するページのスラッグを設定 $i = 0; foreach( $pageSlug as $thisSlug ) { $pageID[$i] = get_page_by_path($thisSlug)->ID; $i++; } if( $typenow == 'page' ) { if( in_array( $_GET['post'], $pageID ) ) { add_filter( 'user_can_richedit', 'disable_visual_editor_filter' ); } } } function disable_visual_editor_filter(){ return false; } add_action( 'load-post.php', 'disable_visual_editor_in_page' ); add_action( 'load-post-now.php', 'disable_visual_editor_in_page' ); |
自動整形の停止
ビジュアルエディタの使用を停止すると「TinyMCE Advanced」プラグインで設定した自動整形を停止する設定が作用しないので、functions.phpに次のいずれかのコードを追加して自動整形機能を停止する必要があります。
全ての記事形式(投稿、固定ページ、カスタム投稿タイプ)
▼functions.php
|
1 |
remove_filter('the_content', 'wpautop'); |
固定ページのみ
▼functions.php
|
1 2 3 4 5 6 7 8 9 10 11 12 13 14 15 16 |
function wpautop_filter($content) { global $post; $remove_filter = false; $arr_types = array('page'); // 自動整形を無効にする投稿タイプを配列で設定 $post_type = get_post_type( $post->ID ); if (in_array($post_type, $arr_types)) $remove_filter = true; if ( $remove_filter ) { remove_filter('the_content', 'wpautop'); remove_filter('the_excerpt', 'wpautop'); } return $content; } add_filter( 'the_content', 'wpautop_filter', 9 ); |
page.phpなど、特定のテンプレートファイルに下記のように記述する方法もあります。
▼page.phpなど
|
1 2 3 4 |
<?php remove_filter('the_content', 'wpautop'); // the_content()の前に追加 the_content(); ?> |
特定の記事のみをスラッグで指定
「xxxxx」の箇所には任意のページのスラッグを設定してください。
▼functions.php
|
1 2 3 4 5 6 7 8 9 10 11 12 13 14 15 16 17 18 19 20 |
function wpautop_filter($content) { global $post; $remove_filter = false; $pageSlug = array('xxxxx','xxxxx','xxxxx'); // 自動整形を無効にするページのスラッグを設定 $i = 0; foreach( $pageSlug as $thisSlug ) { $pageID[$i] = get_page_by_path($thisSlug)->ID; $i++; } $thieID = get_the_ID( $post->ID ); if ( in_array( $thieID, $pageID ) ) $remove_filter = true; if ( $remove_filter ) { remove_filter('the_content', 'wpautop'); remove_filter('the_excerpt', 'wpautop'); } return $content; } add_filter( 'the_content', 'wpautop_filter', 9 ); |
メインエリアのコーディング
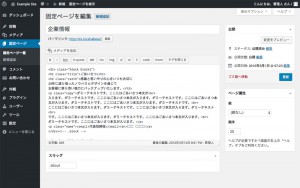
メインエリアは従来のコーディングと同じ要領で記事本文にHTMLコードを直接記述します。
「新着情報」「制作実績」「ブログ」は随時更新可能な動的コンテンツとして処理しますので、まずはプログラム処理が不要なその他固定ページのコーディングから行います。
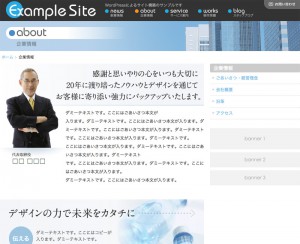
▼固定ページ(企業情報)の記事本文
|
1 2 3 4 5 6 7 8 9 10 11 12 13 14 15 16 17 18 19 20 21 22 |
<div class="block block1"> <h1 class="title">ごあいさつ</h1> <h2 class="catch">感謝と思いやりの心をいつも大切に 20年に渡り培ったノウハウとデザインを通じて お客様に寄り添い強力にバックアップいたします。</h2> <p class="copy">ダミーテキストです。ここにはごあいさつ本文が<br> 入ります。ダミーテキストです。ここにはごあいさつ本文が入ります。ダミーテキストです。ここにはごあいさつ本文が入ります。ダミーテキストです。ここにはごあいさつ本文が入ります。ダミーテキストです。<br> ここにはごあいさつ本文が入ります。ダミーテキストです。ここにはごあいさつ本文が入ります。ダミーテキスト<br> です。ここにはごあいさつ本文が入ります。ダミーテキストです。ここにはごあいさつ本文が入ります。<br> ダミーテキストです。ここにはごあいさつ本文が入ります。</p> <p class="name"><small>代表取締役</small><br>□□ □□□</p> </div><!-- .block --> <div class="block block2"> <h1 class="title">経営理念</h1> <h2 class="catch">デザインの力で未来をカタチに</h2> <dl> <dt class="dt1">伝える</dt><dd class="dd1">ダミーテキストです。ここにはコピーが<br>入ります。ダミーテキストです。<br>ここにはコピーが</dd> <dt class="dt2">楽しむ</dt><dd class="dd2">ダミーテキストです。ここにはコピーが入ります。<br>ダミーテキストです。ここにはコピーが</dd> <dt class="dt3">進化</dt><dd class="dd3">ダミーテキストです。ここにはコピーが入り<br>ます。ダミーテキストです。ここにはコピーが</dd> </dl> </div><!-- .block --> |
スタイルの追加
各ページのスタイル設定には、header.phpファイルのbody_class()に「page-」+「スラッグ」で追加したクラスを使用します。
▼style.css
|
1 2 3 4 5 6 7 8 9 10 11 12 13 14 15 16 17 18 19 20 21 22 |
/*------------------------------*/ /* (page) about */ /*------------------------------*/ .page-about .block { position: relative; } .page-about .block .title { display: none; } .page-about .block1 { background: url(images/about/bg01.jpg) 0 0 no-repeat; min-height: 350px; margin-bottom: 50px; } .page-about .block1 .catch { background: url(images/about/title01.png) 188px 21px no-repeat; width: 680px; height: 140px; text-indent: -9999px; } .page-about .block1 .copy { margin: 10px 0 0 218px; line-height: 2.0em; } .page-about .block1 .name { position: absolute; top: 290px; left: 40px; font-size: 150%; font-family: serif; } .page-about .block1 .name small { font-size: 60%; } .page-about .block2 { background: url(images/about/bg02.jpg) 0 0 no-repeat; min-height: 340px; padding: 30px; } .page-about .block2 .catch { background: url(images/about/title02.png) 0 0 no-repeat; width: 620px; height: 32px; text-indent: -9999px; } .page-about .block2 dl dt { background: url(images/about/img01.png) 0 0 no-repeat; width: 82px; height: 82px; text-indent: -9999px; position: absolute; } .page-about .block2 dl .dt1 { background-image: url(images/about/img01.png); top: 90px; left: 30px; } .page-about .block2 dl .dt2 { background-image: url(images/about/img02.png); top: 180px; left: 120px; } .page-about .block2 dl .dt3 { background-image: url(images/about/img03.png); top: 270px; left: 50px; } .page-about .block2 dl dd { color: #666; position: absolute; } .page-about .block2 dl .dd1 { top: 100px; left: 120px; } .page-about .block2 dl .dd2 { top: 210px; left: 210px; } .page-about .block2 dl .dd3 { top: 310px; left: 140px; } |
【次の手順→】 お問い合わせフォームの作成
【←前の手順】 トップページとサブページのカスタマイズ
おすすめ記事
PR
